
The past two newsletters have covered common locations and reasons for
complications of extraction. This month we will cover how to deal with the
problems after they occur. Read Part One or Part Two.
FRACTURED ROOTS
When faced with a fractured root, the operator should ask himself or herself whether the root needs to come out. In most cases, root tip fragments should be removed in their entirety. Occasionally, a clinician will find that there is more risk to the patient from extracting the root than from leaving it in place. In general, roots from teeth that were compromised should be extracted. If the root tip is non-vital and/or infected, you run the risk of sequestrum formation by not extracting the entire root. Roots that exhibit bony replacement resorption (moth-eaten indistinct appearance on dental radiographs) can usually be left in place. In those teeth, the process of bony replacement resorption will continue until the root is replaced by remodeled bone. This situation is commonly seen in feline teeth that have Type II tooth resorption (aka- “resorptive lesions” with radiographically indistinct roots). The most common time for the author to leave a root in place is with type II resorption in lower canine teeth in cats. These teeth can make up a substantial percentage of the cross-sectional diameter of the mandible, and extraction can involve removal of a substantial amount of bone under the best of circumstances. Attempting complete extraction of these teeth risks mandibular fracture.
A more prudent course in this case might be to amputate the crown, atomize 2-3 mm of the root below the level of the surrounding bone, and then suture a lateral sliding flap over the extraction site. Any time a root is intentionally left in place, this fact should be entered in the patient’s medical record and the owner should be informed of the possibility of future complications. Routine crown amputation of all teeth in feline patients, with the roots left in place intentionally, is a poor practice and should be avoided unless radiographic Type II resorption is visible radiographically.
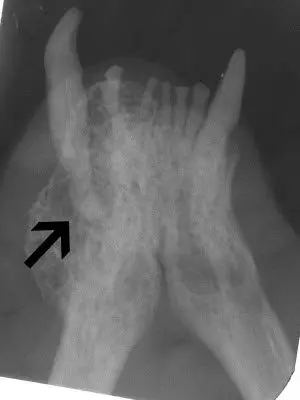
Type I resorption is seen in the root of 404 (arrow). This root requires complete removal. Type II resorption is seen in 304 and may be treated with crown amputation and intentional root resorption.
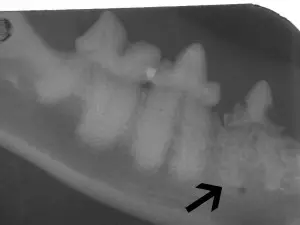
Type II resorption is seen in the roots of the first premolar (arrow).
These roots show type I resorption and were inappropriately treated with intentional crown amputation. Note how distinct the roots are from the bone. The periodontal ligament can not be seen on some of these roots, but this alone is not reason enough to utilize the crown amputation technique.

These are the roots that were extracted from the patient pictured above. After treatment, the owner noted dramatic improvement in the cat’s general demeanor.
When extracting fractured roots the operator should strive to minimize the removal of bone, while successfully removing the root. If the margins of a fractured root are clearly visible, a sharp luxator or winged elevator matching the cross-sectional shape of the root should be utilized. Selecting an instrument that adapts closely to the surface of the root will automatically guide the instrument into the periodontal ligament space. Once inserted, the instrument is gently advanced and “twisted” to fatigue the PDL. This process is continued around the root until the root fragment is mobile enough to be extracted. Since many roots are not round, different areas of the root might require a different shape of dental elevator, matching the shape of the root where it will be placed. Luxators and winged elevators are very thin and can be placed more easily into the PDL. Removal of some of the buccal (lateral) bone may also assist in removal of the root fragment, especially in roots that are located near the lateral surface of the maxilla.
Unfortunately, root fragments commonly fracture near the apical extent of the alveolus, buried deep in the bone, hidden by hemorrhage, with no visible anatomic landmarks. In these cases, the operator has no guidance for correct elevator placement, and may unintentionally cause substantial bony damage in an effort to dislodge the root fragment. The following technique has proved useful to the author when presented with fractured roots, deep in the alveolus, with no obvious visible anatomic landmarks. Extracting these roots can be very frustrating for even the most skilled dental surgeon. This technique is moderately aggressive, but is useful when the operator feels that extraction of these difficult roots is indicated. The astute practitioner must always balance the risk and trauma associated with extracting the root with the risk of leaving it in place. The technique is as follows:
1. The first step is to regain your anatomic landmarks. Excellent lighting and some type of magnification facilitate the process. Select an appropriately sized medium grit cylindrical diamond bur (See order numbers at the end of this article). Utilizing the side or flat end of the cylindrical diamond bur in a high-speed handpiece, flatten the fractured end of the root and a small area of surrounding bone. The shape of this but allows it to be placed down into an alveolus when the root tip is fractured near the apical extent of the alveolus. This process is continued until the root is clearly visible in cross-section, with the interface between the root and bone clearly distinct. Try to keep the amount of bone removal as minimal as possible, while still providing adequate visualization. The alveolus may need to be widened slightly to allow good visualization and the side of the cylindrical bur may be utilized for this purpose. Your goal is to create a small flat area, with the root visible in the center of the area, surrounded by a small amount of bone. Normally the root can be identified in 10-20 seconds. Use of the air-water syringe can help remove debris and improve visualization.
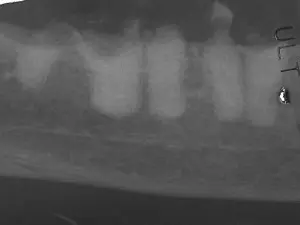
Fractured distal 108 root (arrow) with inadequate visualization for extraction.
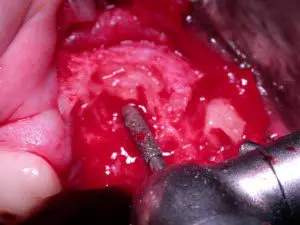
The end of a cylindrical diamond bur is used to flatten the root and a small area of surrounding bone until the root is distinct from the bone.
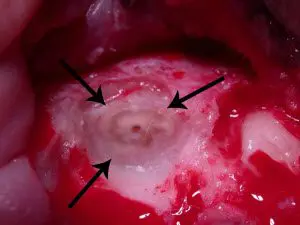
The root can now be distinguished from the surrounding bone.
2. The next step is to create a space for your dental elevator. Even though the root is visible, it is usually not possible to place an elevator into the PDL. Utilizing a small ½ round bur, make a small “gutter” all the way around the root. Drill the gutter in the bone immediately adjacent to the root, making the gutter 2-3 mm deep. Try to follow the specific curvature of the root as you make your gutter. Remember, many roots are not round in cross-section.
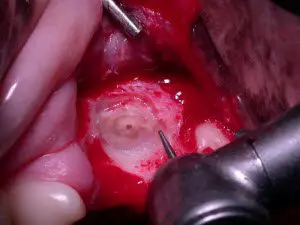
A 1/2 round bur is used to make a gutter around the root in the adjacent bone. the gutter should be made 2-3 mm deep around the complete circumference of the root.
3. The final step is to remove the root fragment. Select a luxator or
winged elevator whose curvature matches the curve of the gutter you just
created. Gently place the instrument into the gutter, twist, and hold moderate
pressure for 10-20 seconds. Avoid pushing the instrument toward the root as
this may displace the root the nasal passages or mandibular canal. You may need
to utilize more than one elevator to match the variable cross-sectional shape
of the complete circumference around the root. The root fragment will commonly
rock as soon as you begin to elevate around the root. Work your way around the
root, gently repeating until the fragment is extracted. Should the root
fracture again, the process can be repeated.
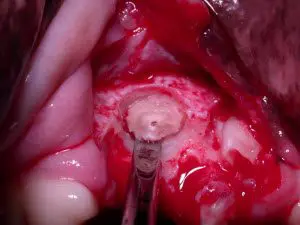
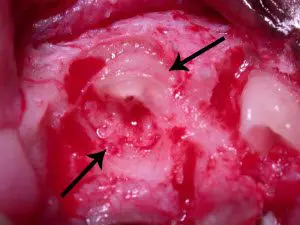
An appropriately shaped luxator-type instrument is placed in the gutter and the root is removed by gently inserting the elevator and applying a twisting type of motion around all sides of the root.
One point that should be emphasized is minimizing bone removal. In smaller dogs and cats, a cylindrical diamond bur of smaller diameter can be used. In general, with root tips located near the apex of the alveolus, the diameter of the alveolus will need to be enlarged 30% wider than the diameter of the root fragment. Familiarity with this technique will allow easy identification and removal of fractured roots, while minimizing trauma to the patient. The technique is very useful when dealing with fractured palatal roots of upper fourth premolars and many mandibular teeth. The technique is also useful when dealing with teeth in which the PDL is very narrow in both dogs and cats.
HEMORRHAGE
Hemostatic gelatin sponge products such as VetSpon or Gelfoam are quite effective at controlling hemorrhage. If excessive bleeding is encountered, place some of the product into the extraction site and hold it in place with a gauze sponge and gentle pressure for 1-2 minutes. VetSpon is packaged in a strip of individual cubes, making it very convenient to select the amount required.
ONF
If the operator recognizes that they have created an oro-nasal fistula during the course of an extraction, this must be addressed during the closure. A few principles must be adhered to when closing these sites, including suturing fresh edge to fresh edge, avoiding any tension whatsoever in the flap, avoiding covering any intact epithelium and placing the suture line over bone instead of over the ONF. Detailed technique considerations for ONF repair will be reviewed in next month’s newsletter.
MANDIBULAR FRACTURE
An observant operator should get plenty of warning before the mandible fractures completely. If a fracture is recognized before complete separation of the fragments, conservative treatment with placement of demineralized freeze-dried bone graft into the fracture site (Periomix by VTS), suturing the soft tissues and placing the patient in a nylon muzzle for several weeks is usually sufficient. If the fracture in unstable, further treatment will be indicated. Treatment of unstable mandibular fractures is beyond the scope of this paper.
ROOT TIP DISPLACED INTO THE NASAL PASSAGES
When recognized before the root tip is completely displaced out of the alveolus, they can sometimes be grasped with a root tip forcep or teased gently back into the extraction site with a root tip pick or small curette. Another technique that can be useful is to place a 14 gauge IV catheter onto a suction unit. This will improve visualization and will sometimes attach to the root tip and remove it from the site. Whatever you do, strive to avoid any manipulation that can push the root tip deeper into the nasal passages. Once a root tip has disappeared into the nasal passages, retrieval is much more difficult. In some cases, flushing water into the nose with a syringe will flush it back toward the extraction site. Taking dental radiographs in two planes (DV and bisecting angle) can help triangulate the position of the root. In some cases, a window can be cut into the palate or overlying maxilla adjacent to the root structure. An appreciation for the location of adjacent vital structures can help avoid further complicating when creating these windows.
ROOT DISPLACED INTO THE MANDIBULAR CANAL
The comments made above for retrieving root tips from the nasal passages apply here as well. In the mandible, the location of the root can be easily confirmed with dental radiographs. If you can see the root but cannot judge exactly where it is, drill one or two small “dents” in the mandibular bone with a #4 bur, roll up very small balls of soft lead foil (from a dental x-ray film), place them into the small holes you drilled and take a dental X-ray. You will see where the root tip is in relation to your small lead markers. In some cases, a small window into the mandibular canal can be cut in an appropriate location, and the root tip can be directly retrieved or flushed back toward the original extraction site. When working in the area of the mandibular canal, great care should be taken to avoid lacerating the large mandibular neurovascular structures. Excessive bleeding makes root retrieval very difficult.
SUGGESTED EQUIPMENT FOR TROUBLE-FREE ORAL SURGERY
- Dental x-ray capability is mandatory for dentistry. If you can’t assess your surgical site, you are flying blind.
- High speed drill w/ integrated water spray and LED lighting in the handpiece
- High-speed handpiece (drill) with a swivel connector to decrease hand fatigue
- Good bur selection-sizes ½ for broken root removal, 1,2,4 for lateral bone removal, 700 and 701L for sectioning teeth.
- Large and small cylindrical diamond burs for smoothing rough bone and retrieving fractured roots (Dentalaire DTP837-018 and DTP835-014)
- Thin, sharp dental elevators. The thinner “luxator” types of elevators are preferred. A set of winged elevators plus a couple straight luxators (5mm and 7MM) constitutes a good selection.
- Magnification – Optivisor magnification headband or preferably custom surgical telescopes made just for you
- Excellent lighting- good overhead lighting directed along your line of sight or a bright, headband mounted LED light. There is no such thing as too much light.
- Root tip picks- canine and feline sizes for plucking loose root tips out of the deep aspect of an alveolus.
- Root tip forceps- another way to grasp a loose root tip or bone fragment.
- Sharp periosteal elevators for raising flaps. The author prefers a Molt 2/4 double-sided periosteal elevator.
- Short (5 ½ inch) needle holders for better control
- Brown-Adson thumb forceps to minimize trauma
- Dental-specific Dean scissors allow precise tissue manipulation, provide excellent visualization of the surgical field and cut fine suture without having it slip. Some people prefer the smaller LaGrange scissors.
- Suture material- 4-0 (for dogs) and 5-0 (for cats) absorbable suture on cutting or reverse-cutting needle. The author prefers synthetic monofilament suture such as Biosyn or Monocryl.
- Graft material- the following are all readily available in the veterinary marketplace. These are presented in increasing order of efficacy and cost.
- Consil – a Bioglass that forms hydroxyapatite on its surface. Product is never resorbed. Bone (15%) forms in between the particles (85%). (Nutramax)
- Synergy – Synthetic bone allograft. Tri-calcium phosphate and hydroxyapatite,sintered together. Is osteoinductive, meaning that it induces progenitor cells to become osteoblasts. Is mostly resorbed and the result is 85% bone and 15% hydroxyapatite (VTS=Veterinary Transplant Services). This is slightly more expensive than Consil, but much more efficacious.
- Fusion – A combination of Synergy and DFBG (see below). Induces two different pathways of osteoinduction for better bone formation (VTS)
- Periomix – Demineralized freeze-dried bone graft (DFBG). This is the gold standard for bone production. (VTS).
- VetSpon cubes or Gel-foam for hemostasis
- Soft lead foil from a regular dental X-ray film for fashioning small radio-opaque markers on the patient that can be seen on x-rays.
- Bonded sealant kit for iatrogenic dentin exposure
Next Month- Repair of Oro-nasal fistulas